Saturday, July 5, 2014

Sunday, July 1, 2012

Celena & Martin of the Filigree

Here in Colorado Springs, I have been missing the abundance of wildlife that we usually see in our backyard. There are still birds and the occasional deer or raccoon, but where are the others? Ahh, I think I have found them, hiding out in Tennessee.

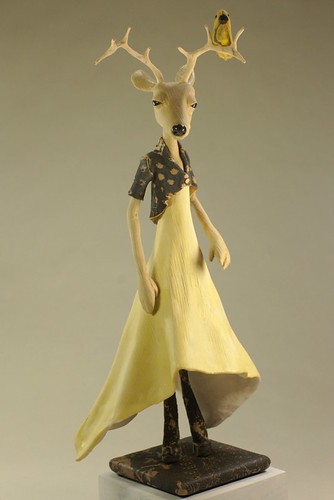
Celena and Martin, the husband and wife team of the Filigree, curently live outside of Nashville, and create fairy tale polymer clay and mixed media dolls and sculptures. Martin Øbakke works on sculpting and illustrating these fantasy figures while his wife, Celena Cavala, weaves stories of their world in the fairy tale nonsense news, The Filigree.

Enjoy their work at these sites:
http://www.thefiligree.com
http://thefiligree.etsy.com
http://facebook.com/thefiligreequarterly

Monday, September 5, 2011

Mini bears demo for Sept. guild meeting

Bear with bird friends - by Jainnie Jenkins
 
Hi everyone!  For this coming Sunday meeting I'll be demo-ing mini bears! I was having a hard time figuring out what I wanted to demo, and my husband said, "do what you like...you like bears" so bears it is. 

I've been making a bunch of different types of bears and will bring these to the meeting.  If you are interested in trying to make your own bears, here is a supply list:

--Raw Sienna clay (or any brown clay) (1 block should be good)
--White clay (1/2 block or less)
--Translucent clay (1/2 block or less)
--Yellow cadmium clay (1/2 block or less)
--Black clay (small amount)

Tools:
--pasta machine, roller, or hands for conditioning clay
--Ball stylus (optional)
--Regular stylus (with pointy tip)
--Colour Shapers (optional...these are tools with various rubber tips. I like to use Size 0 Cup Round, and the Size 0 Taper Round)
--Cutting blade or Xacto knife

Another optional item is:
Acrylic paints (these are for creating washes over the bears after they are done baking.  I used black and white paint).

Here are a couple pics of some of the bears I've made.  Like I said, I'll be making more before the meeting!  See you there! (And I'm also including a pic of our bear that frequents our backyard.)

And please remember that Membership fees are due this month and we will be having elections for board positions that are open. :)

--Jainnie

Mini bears - by Jainnie Jenkins
Mini bear - by Jainnie Jenkins
Mr. Bear in my backyard (he's a good bear!)

Thursday, August 25, 2011

Kiva Atkinson - miniaturist extraordinaire!

Drunken Octopus - by Kiva Atkinson
I must admit something...I love Kiva Atkinson. And if you don't know who I'm talking about, well read on to find out! Kiva is an International Guild of Miniature Artisans (IGMA) Fellow who loves to make polymer clay miniatures in 1:12 and 1:24 scale and...has a penchant for the funny, wacky, and unusual...which is exactly why I love her. A lot of her minis are food related, but she also does some other wild and bizarre creations, the googly-eyed ones...you'll see what I mean. Oh, and she lives in Honolulu, Hawaii...my hometown!

I'm posting a bunch of her creations along with a number of Halloween-ish ones for those of you who want something other than cute pumpkins 'n kittycats! Enjoy! And then head on over to Kiva's links, listed below.

Green Figs - by Kiva Atkinson
Moroccan Chicken Kebabs - by Kiva Atkinson
Snook Board - by Kiva Atkinson
Tacos - by Kiva Atkinson
Giant Fruit Platter - by Kiva Atkinson
Skeletal Fish Pie - by Kiva Atkinson
Chinese Potstickers - by Kiva Atkinson
Egg Roll Heads - by Kiva Atkinson
Mango Heads - by Kiva Atkinson
Toast Heads - by Kiva Atkinson
Peeping Oyster Bowl - by Kiva Atkinson
Halloween Breakfast - by Kiva Atkinson
Eyeball Soup - by Kiva Atkinson
Mummy Noodles - by Kiva Atkinson
Pumpkin Basket - by Kiva Atkinson
Salty Bones - by Kiva Atkinson
Witch Treats - by Kiva Atkinson
Drunken Squid - by Kiva Atkinson

Links: 
Kiva's Miniatures
Kiva's Miniatures Blog
Kiva's Flickr Photostream
Kiva's Ebay Page

Wednesday, August 24, 2011

Zentangles and Textures, Meeting Notes

During our June meeting, Jerry Hunt and Peggy Davis did a demo on Zentangles.  Members were asked to bring white polymer clay, black Micron pens, and if possible, a heat gun.

Zentangle inspired pendants (and a mixed media one!) by Eva Rosado
Jerry also shared (during the August meeting) some of the zentangle pendants that Betty Wilkinson made. The instructions for making our own zentangle pendants were to condition the clay and cut them into your preferred shape. Smooth on cornstarch to each piece and place them in the oven to bake. After they have cooled, use a micron pen (with pigment ink) to draw your designs. Heat set with a heat gun on a ceramic tile, or put back into the oven for 5 minutes. Seal with fimo glaze. Julie Eakes has an interesting zentangle book out you may want to check out. 

Micon pigment ink pen - used for drawing Zentangles
Julie Eakes - Clay Classics Inspired by Zentangle
Zentangles from Cathie Graeser and her grandkids
Zentangle inspired pieces, by Betty Wilkinson
Zentangle inspired pieces from Betty Wilkinson
More Zentangle inspired pieces from Betty Wilkinson
Besides all of the lovely Zentangles shared during the August meeting, members were also asked to bring Mold Maker or Bend n Bake clay and various stamps or textures. A few of us created texture sheets. Mold maker is more flexible after baking but Bend & Bake is also fun to make texture sheets with. Tejae likes to make hers thin enough to go through the pasta machine with a sheet of clay.

Sculpey MoldMaker (Super Elasticlay)

Sculpey Bake & Bend Clay


For my own texture sheets, I've used both Super Elasticlay (Mold Maker) as well as just plain scrap clay.  If using regular clay, I just make sure to dust lightly with talcum powder so the clay impression will release easily.  I've made texture sheets with rubber stamps...but I enjoy adding additional texture to really make it "my own."  It is also fun to create your very own texture sheet using such tools as a ball stylus (they come in different sizes) and various pointy things such as bamboo skewers!  

Barrettes made from texture sheets - by Jainnie Jenkins. The gold one was made from a texture sheet made with multiple rubber stamp impressions, then adding in little "dots" with a ball stylus.  The blue one was made from a texture sheet (seen in the corner) made of dried alphabet pasta. (The top one was not made from a texture sheet.)
Polymer clay pendant -- by Jainnie Jenkins. The background was made from polymer clay and silver leaf. The center was made from a texture plate. I used an oriental fan rubber stamp, impressed other flower beads, then added various lines around those impressions.  The possibilities are endless!
Polymer clay pendant by Jainnie Jenkins. This was made from an impression of a plastic texture sheet. After baking the textured clay, I added in liquid polymer clay for a cloisonné effect.
Textured polymer clay beads by Jainnie Jenkins. These were made from texture sheets and/or rubber stamps.
Textured beads by Jainnie Jenkins. These were made from a handmade texture sheet.  I used a ball stylus and bamboo skewer to make all the designs. Then I baked it, dusted with talcum powder, and took clay impressions. Pearl Ex was rubbed over the top to highlight the texture design.

We also gathered around the tv to view Nan Roche's "Special Techniques in polymer clay" video. An oldie but goodie!

Nan Roche - Special Techniques in Polymer Clay video
At the end of the meeting Jerry collected our names on pieces of paper to do a drawing for a Donna Dewberry Sculpey texture sheet. Bev drew Tejae's name! :)
Sculpey texture sheet - by Donna Dewberry
 See you at the next meeting!

Tuesday, June 28, 2011

Pics from April Guild Meeting

Here are some pics from the April Guild Meeting.  Tejae did a demo on how to shoot better photos of your work -- with very little fancy equipment I might add! -- and of course I think I was taking pics with my iPhone of all things..., and Robert Wiley and his wife visited our group from Texas and ended up doing a demo for us.

Tejae discussing how easy it is to take better photos
Tejae taking pics of members' work
Robert "Bob" Wiley showing Peggy Davis how to do the "Sutton Slice" technique
Filling a rubber stamp with a Skinner Blend
Press, press, press Peggy! Get that Skinner Blend in there!
More pressing!
Now to shave away the excess clay
Careful for Bob's fingers! :)
Peggy Davis, ever so intent on her clay work
Butterfly wing rubber stamp with Skinner Blend
Feeling happy after all that work
Bev observes Peggy's Sutton Slice butterfly wings
Peggy Davis with Robert Wiley and his wife
Peggy Davis' vase with Sutton Slice Butterflies...beautiful!
Claywork by Robert Wiley
Assorted cabochons by Robert Wiley
Claywork by Robert Wiley
Claywork (Sutton Slice Technique) by Robert Wiley
 Thanks to Robert for showing us the Sutton Slice technique.  We were all quite intrigued!  And Peggy, your vase and butterflies came out beautifully!

If you'd like to learn more about the "Sutton Slice" technique, check out Lisa Pavelka's Business Card Holder project from HGTV.

Related Posts Plugin for WordPress, Blogger...